-
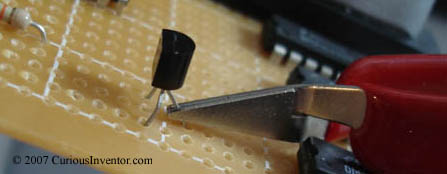
- Start with clean components: Flux can remove small amounts of oxides, but will be of little help for heavy oxidation, grease, oil or dirt. Notice how the solder in the adjacent picture has been repelled by the heavily oxidized pin. It may be necessary to lightly use steel wool or fine grit sand paper to remove especially bad oxides. Some people say that you should not do this because it creates scratches that can promote future oxidation… sand at your own risk. Use Silicon Carbide sandpaper (black) as opposed to Garnet (brown, for woodworking) sandpaper because the Garnet paper will shatter and become embedded in the metal. An effective and gentle alternative is to use a pink eraser, especially for copper traces.
- Clamp your work:PanaVise makes a popular clamp that accepts several different attachments for holding different sized circuit boards. It’s by far the most popular clamp and is also very sturdy. Having the work held in place is especially helpful for desoldering when it’s necessary to push or pull a bit. The alligator hands are a cheap alternative.

-
- Wire preparation:Tin stranded wires so they don’t “bird-cage,” or bend out from their original lay. Expand for instructions on the correct way to strip a wire manually, use an automatic stripper, and tin wire.
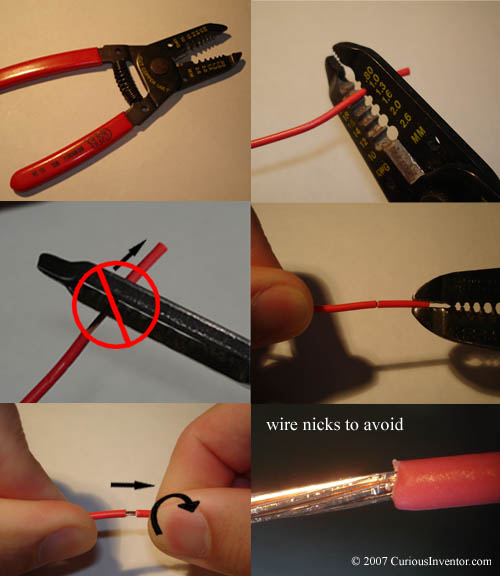
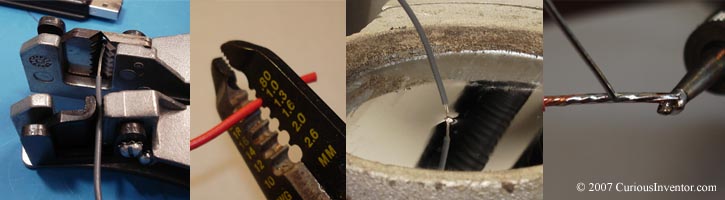
- Manual wire stripping:The natural way you would think to use the wire strippers is to first cut the insulation, and then use the same cutting hole to push off the insulation slug. In production environments where reliability is critical, this is not allowed because it’s very easy to nick the wires this way. The pliers at the tip of the stripper are actually meant to remove the insulation slug. First score the insulation with the cutting hole, and then pull it off with either the pliers or by hand. If removing by hand, twist slightly while pulling to keep the strands in place. This is the “right” way to strip a wire, if you’re careful, pulling the insulation off with the cutting hole is probably fine.
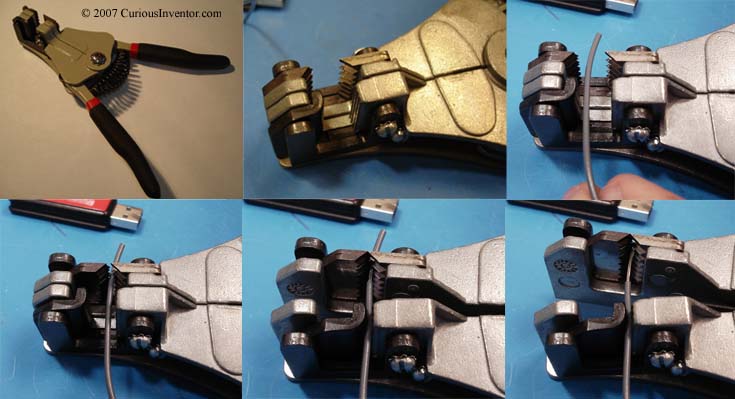
- Automatic stripping:With one squeeze these cut and pull off insulation.
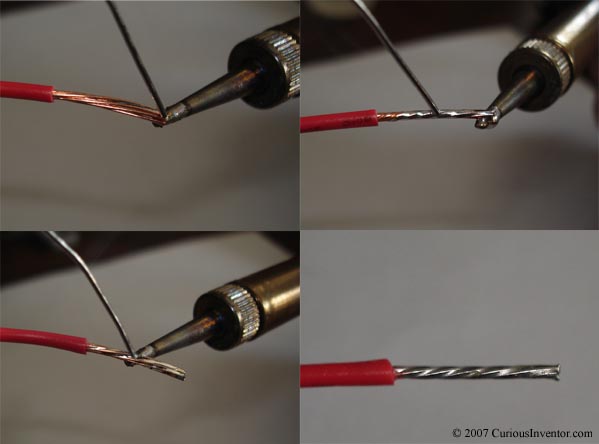
- Tinning:Just like soldering a joint, the key here is to apply solder to the wire, not the iron tip. If the wire is hot enough to melt the solder directly, then it’s hot enough to form a good bond with the solder. Hold the iron against one side of the wire and apply a small amount of solder in between the tip and wire to form a heat bridge (if there isn’t already enough solder from tinning the tip). Now apply solder to the opposite side. The solder should wick into the strands. Move the iron and solder as necessary to coat the surfaces. You should still be able to clearly see the individual strands when it’s complete.Don’t tin wires that are going to be held in clamping terminals since the solder will slowly deform under pressure and cause the connection to come loose.
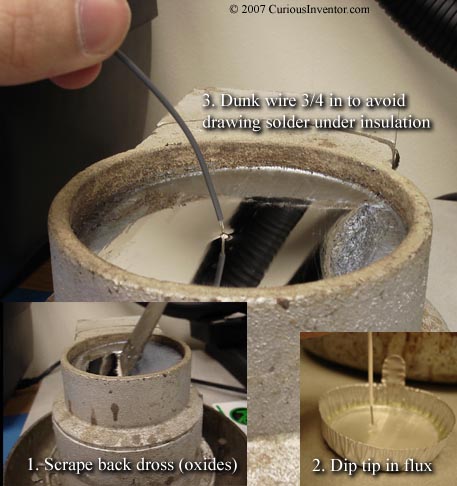
Got a lot of tinning to do? For under $300 you can get a vat of molten solder to speed up the process. The only catch is that there’s no flux in the vat, so you need to dip the end of the wires in liquid flux before dunking them in the molten solder. Only dip the very end of the wire in the flux; capillary action will draw it further up the strands. If you dipped more than just the end into the flux, the capillary action would draw flux beyond the insulation where it can’t be cleaned, and would eventually corrode the wire.
- Manual wire stripping:The natural way you would think to use the wire strippers is to first cut the insulation, and then use the same cutting hole to push off the insulation slug. In production environments where reliability is critical, this is not allowed because it’s very easy to nick the wires this way. The pliers at the tip of the stripper are actually meant to remove the insulation slug. First score the insulation with the cutting hole, and then pull it off with either the pliers or by hand. If removing by hand, twist slightly while pulling to keep the strands in place. This is the “right” way to strip a wire, if you’re careful, pulling the insulation off with the cutting hole is probably fine.
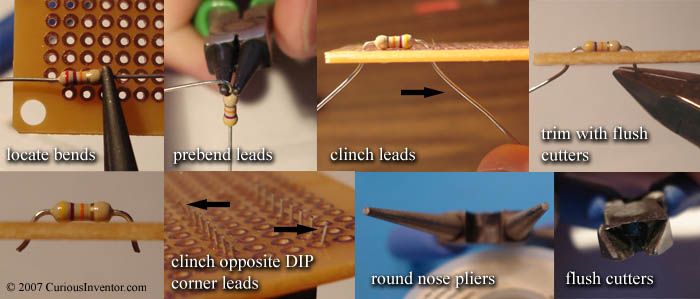
- Insert, clinch and trim components: First, make bends beforeinserting the components. Avoid stressing the connection between lead and component by bracing the lead with pliers while bending. Pliers with serrated tips aren’t used in high-reliability production because the grooves can create nicks in the leads that eventually cause a break after a lot of vibration and thermal changes. Round nose pliers make it easy to make any sized radius.Unless the component has a metal casing or needs clearance for air flow to keep cool, insert it until it’s flush with the board. This doesn’t apply to some transistors, and also capacitors that have plastic coverings that need to be kept out of the solder joint. Clinch or bend out the leads so the component is held in place during soldering, and finally trim the leads to about the radius of the pad. Trim the leads before soldering since doing so afterwards can shock and crack the joint. Wearing safety glasses for this process is not at all excessive–those leads can get you. Everything else about proper component installation: NASA guide.
- Wire preparation:Tin stranded wires so they don’t “bird-cage,” or bend out from their original lay. Expand for instructions on the correct way to strip a wire manually, use an automatic stripper, and tin wire.
- Add heat sink: Some semi-conductors (some transistors and diodes) are especially heat sensitive. This clip acts a heat shunt to keep the transistor protected.