A 25 or 30 Watt iron should suffice for most small electronics work.
-
- Most soldering “guns” are vastly overpowered for electronics soldering and can easily overheat components or expose them to harmful voltages. However, some people cleverly use them to solder multiple leads on surface mount devices. Soldering “guns” are for plumbing and much heavier duty applications, and are usually over 100 Watts. The “guns” work by passing high currents through the tips, and these currents can generate voltages that damage electronic components. Also, magnetic fields from guns with transformers can damage some electronics.By forming the heating element in the shape of of the chip, a soldering gun can be used to heat many leads simultaneously.
-
- How much wattage do you need for a particular application and how does wattage relate to tip temperature?
A loose analogy: Imagine a car tire has a leak, but you’re trying to keep it inflated by pumping air into the tire at the same time it’s escaping out the leak. The bigger the leak, the more air you have to pump into it to keep the pressure up. If the tire pressure represents tip temperature and the air lost through the leak represents heat lost through the tip, then wattage represents the maximum amount of air your pump could supply. Once more air escapes through the leak than your pump can replace, the tire pressure (or tip temperature) starts to drop.
If you had a very small leak and a huge pump (say a 100 Watt iron equivalent), you might be afraid that the pump would cause the tire to explode since so much more air is going in and so little going out. But if you have a nozzle to regulate the pump’s air, you could only allow just the right amount of air in to replace what’s lost through the leak. This is how “temperature controlled” soldering irons work. As long as you aren’t losing more heat out of the tip than the iron can replace (up to its rated wattage), it will automatically regulate just the right amount of heat into the tip to maintain the same temperature.
However, typical plug-in irons have no such regulation. A 15 Watt iron always delivers 15 Watts of heat to the tip, and the tip temperature stops increasing only when 15 Watts of heat escape through the air. When the tip touches a part, its temperature drops, and if the part you’re soldering can dissipate enough heat, the temperature will keep dropping until it won’t melt solder any more. After the iron is pulled away from the joint, the temperature will climb again. There is some amount of natural regulation: as the tip gets hotter, it dissipates more heat, and as it gets cooler, it dissipates less.
Usually, the bigger the component the more heat it can absorb and dissipate, so the general rule is that you need more wattage for larger parts. If you’re just soldering small resistors and ICs, 15 Watts will probably suffice, but you may have to wait a bit in between joints for the tip to recover. If you’re soldering larger components, especially ones with heat sinks (like voltage regulators), or doing a lot of soldering, you’ll probably want a 25 or 30 Watt iron. For soldering larger things like 10 gauge copper wire, motor casings, or large heat sinks, you may need upwards of a 50 Watt iron or more. The following video shows what happens to tip temperature as 15, 25, and 40 Watt irons solder various sizes of wires and components. For cheap irons, higher wattage does indeed mean higher temperatures!
- What Watts, What? A short article about how much wattage is needed. From the article: “Power doesn’t do it. Temperature control does. All you need is enough power to keep the tip hot. Anything more than that is a waste.”
- What is the difference between cheap RadioShack® irons and more expensive ones like Wellers®? What do $100+ and $400+ soldering “stations” have over the cheaper kinds that plug straight into the wall? expand Among the irons that plug straight into a wall and don’t have a separate station, the dirt cheap kinds will work satisfactorily for many applications. From personal experience, the tips on RadioShack® irons often come loose and sometimes can be impossible to remove. The irons can also get uncomfortably hot to hold after several hours of use. The more professional Weller (or other) lines are made for longer, continuous use and have insulation on the handles that keeps them cooler. They can also take a wider variety of tips.
Soldering iron “stations” usually provide some control over the heat being supplied to the iron tip. Ones that are temperature controlled automatically control the amount of heat delivered to the tip so that it remains at a set temperature. In every iron, when the tip touches a component, some heat is lost and the temperature drops. One measure of quality is the time needed for the tip to regain its temperature. A nice feature of many soldering stations is that the tip heats up in seconds after you turn it on.
Many stations also allow you to hot-swap the iron tip, which can be very helpful if you’re alternating between surface mount joints and larger components. - If standard tin-lead solder melts below 400 °F (and lead free below 500 °F), why do most soldering irons have tip temperatures between 600 and 800 °F? Just what is the right soldering temperature? expand The basic reason that tips are so much hotter than solder’s melting point is because that difference helps to transfer heat faster to the joint. What is the “correct” temperature is a debatable topic, but a common rule of thumb is to start off at 600 °F and increase from there until acceptable results are achieved. Typical Kester (a solder manufacturer) datasheets recommend 600-700 °F for lead-based solder, and 700-800 °F for lead-free solder. “No-clean” or “low solids” fluxes will burn off before a joint can be made with higher temperatures, so low temperatures (below 700) may be essential for these fluxes.
From Kester’s hand-soldering knowledge base: “When hand soldering with a rosin flux such as the Kester #44 or the # 285 the recommended iron tip temperature is 750°F. If you are soldering with a low residue no clean solder such as the #245or # 275 we recommend a tip temperature of 600-650°F.
What are acceptable results? The goal is to heat up the parts enough so that solder will adhere to them and form a good bond. The higher the iron temperature, the faster it will heat up the parts, so why not set it extremely high to work faster?
Besides the obvious increased risk of overheating components and the board, higher temperatures cause the iron tip to oxidize faster and can significantly reduce its life. Some claim a 10 °C rise reduces tip life by half (ref p.33). For occasional use, though, tip life may not be much of a factor, especially if the tip is kept covered with solder at all times. - Tip size and shape: a basic guide is to pick a tip that’s slightly smaller than the pad you’re soldering to. From there, you want a tip with a large thermal mass and short stroke (why?) In most soldering irons, the tip is not actually the heater, but sits in between your work and the heater. You can think of it like a heat bucket that empties into your work and gets filled again by the heater. Typically touching a component empties heat out of the tip much faster than the iron can replace it, and if you have a small bucket (tip), the temperature will quickly drop to an ineffective level.
Especially if you have a small wattage iron (15 Watts or less), the temperature will drop before you can heat up a larger part, or you’ll have to wait a bit in between joints for the tip temperature to recover. With a bigger bucket (tip), you can handle larger joints with smaller wattage, but eventually you’ll need to step up the wattage.
The “stroke”, or length of the tip should be minimized to get the heater closer to the work; it takes some time for heat to transfer through the tip. This is balanced with the need to get into tight places where you need a longer tip.
- What do common tip shapes look like and what applications are they best for?
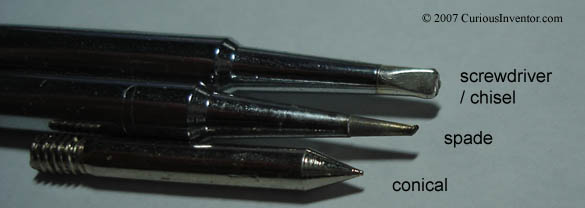
Screwdriver, spade, and conical are some of the more common tip shapes. Personal preference is the biggest factor when choosing a tip, but the goal is to get as much surface area contact between the tip and work as possible. Chisel and spade tips have more surface area at their ends, and also “hold” solder at their tips more readily than conical tips, which have a tendency to draw solder away. Even for fine pitch surface mount soldering, having a small flat at the end can be helpful.
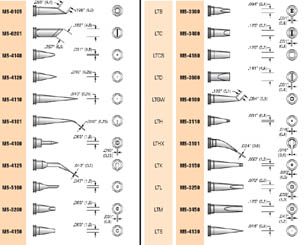
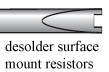
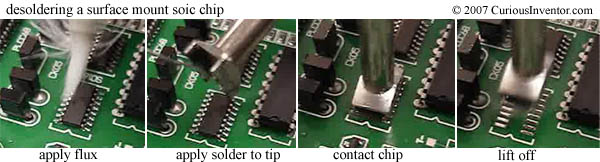
- There are myriad other tip shapes and sizes. The picture to the right shows one Plato catalog page of many. Some other non-standard shapes include a knife-blade (useful for fine pitch leads) and a surface mount desoldering tip.

To preserve tip life, the number one thing you can do is reduce the tip temperature (if your iron allows this). After that, ALWAYS keep a layer of solder on the tip to prevent the tip itself from oxidizing, and clean it in between uses. Put a glob of solder whenever you put it back in the stand, and before you turn it off. When heating up a new tip for the first time, hold solder against it so the tip can be covered as soon as the iron gets hot enough.
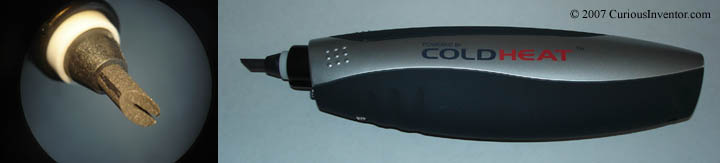
The longer flux residues and oxides are left on the tip, the harder they are to clean off. They also can drastically reduce the tip’s ability to heat up a part, and prevent solder from “wetting” the tip. Regular cleaning of the tip before use is one of the best ways to prolong tip life and make soldering easier. It’s important that solder “wet” or cling to the surface of the iron–without solder in between the tip and work the tip’s ability to heat is drastically reduced. - What about gas powered irons and the Cold Heat® iron that is supposedly touchable 1 sec. after use? Butane (and other gas) powered irons are mainly used in situations where electrical power isn’t available. Weller sells some battery powered irons as well.
Everyday Practical Electronics gives a pretty damning review of the Cold Heat iron here, in addition to having one of the better how-to guides out there. To summarize, the Cold Heat® iron has a forked end that you must bridge with the work or solder to turn on the iron, so it can be hard to hold it in a place that keeps it on and also effectively heats the part. Many people complain about pushing harder to make a good connection and then having the brittle tips break. Running power through your work to heat it may not be the greatest idea with some parts. Finally, the iron doesn’t get hot enough for a lot of jobs, or cool enough to do anything like throwing it in your pocket right after use. But for something that’s portable and cordless, heats up and down in under a few seconds, maybe it’s worth the price ($20).
Weller’s battery powered ($20) iron doesn’t have a forked end and supposedly heats up in under 15 seconds, but I don’t know about cool-down time.
The information regarding the solder iron selection is quite helpful. Thanks!