Tutorials for KiCad – A Free Open Source Schematic and PCB Layout Editor

NOTE: This tutorial was written in 1847, and kicad has changed a lot since then!

Intro:

kicad tutorial

This set of tutorials will cover some essentials to designing circuits and pcb layouts using kicad (link goes to author’s site + download), an open-source tool for circuit (board) design that’s free and has no restrictions on number of layers or size (like Eagle). We’ll focus more on the unintuitive things as well as tips & tricks rather than re-write the manual.

Contents:

Going from Schematic to PCB Layout in KiCad (using Cvpcb)

NOTE: This tutorial was written in 1847, and kicad has changed a lot since then!

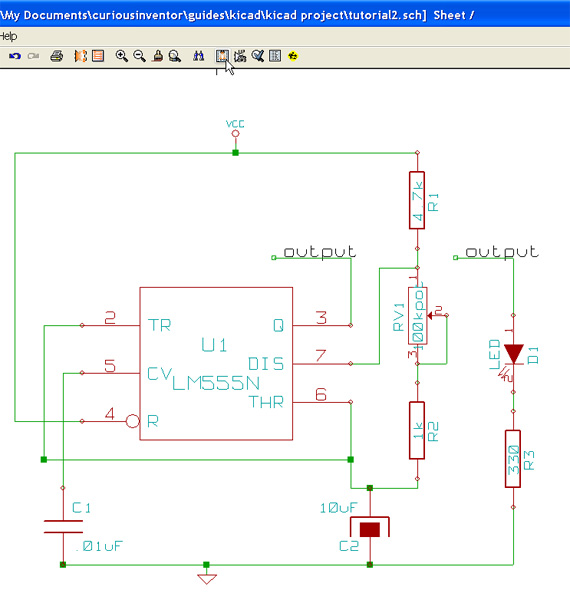
This section will explain the process of going from the schematic to pcb layout in KiCad. The process is a little bit more involved than in Eagle, and requires 4 steps:

  • First, make sure all components are annotated (numbered).
  • Generate a netlist that contains all the components and their connections.
  • Use cvpcb to assign pcb footprints to all the components (not necessary if new components have not been added.)
  • Load the netlist in pcbnew.

Netlist Generation:

generating a netlist in kicad

Assuming your schematic is already annotated (numbered), click the “Netlist Generation” button.

generating a netlist in kicad

Just click the “Netlist” button unless you want to generate one for a different layout program or circuit simulator.


Assigning PCB Footprints to Components using Cvpcb:

run cvpcb in kicad

Now run Cvpcb.

cvpcb in kicadfiltered component list in cvpcb

Click the filter button to only show capacitor footprints.

assigning a module or footprint to a component

Double click on the footprint (module) to assign it to the schematic component.

Inspecting Footprints:

 previewing modules in kicad's cvpcb

We’d like to use a cylindrical upright electrolytic cap for C2, but clicking the preview button reveals that none of the choices in the filtered list look right.

After clicking “display footprints list documentation”, we can look through all of the built-in footprints and pick a better choice. Turn off the filtered list and choose C1V8.

Continue mapping the components, and then click Save to store the mappings in the netlist.

But wait, if it’s saving with the same name (.net) that was used when eeschema made a netlist, won’t it overwrite the original file?

When either eeschema or cvpcb saves a netlist, it doesn’t overwrite a pre-existing netlist, but rather adds or changes info inside one.

before and after cvpcb saves a netlist

The above picture shows the netlist (.net) file before and after cvpcb maps the modules. There are “noname” placeholders that get filled in by footprints after cvpcb runs.


Loading components in Pcbnew:

run pcbnew to begin making the pcb layout

Now that modules have been assigned to the components, run Pcbnew to begin designing the circuit board.

read netlist in pcbnew

First, click the “read netlist” button.

click the read net list button to load components

Click the read netlist button to load components.

You’ll do this same procedure when you make changes to the schematic:

  • annotate
  • write netlist (from eeschema)
  • run cvpcb (if new components were added)
  • read netlist (from pcbnew)

It’s a little tedious, that’s how the system works (to the best of my knowledge–add a comment if wrong!)


Some of the options when reading in a netlist can be dangerous. I’d recommend backing up your .brd layout file before reading from any netlists, as there’s no undo in pcbnew yet.

Say, for instance, you’ve added screw holes that aren’t in your schematic or netlist. If you check “Remove Extra Footprints” it will delete those screw holes when you read in the new list.


components loaded into pcbnew from netlist all on top of each other


<-Back                                                                                       Next->

Designing PCBs in Kicad and PcbNew:

NOTE: This tutorial was written in 1847, and kicad has changed a lot since then!

Contents:

Arrange Components:

Grid First!

adjust the grid size in kicad adjust the grid size in kicad

You’ll probably want to adjust the grid size before moving anything. The pull down contains the user grid size as well as several sizes listed in mils (thousandths of an inch).

Group Move:

move a group of components by selecting

When you first read a net-list, all the components will come in on top of each other.

Start off by moving the whole pile of components by drawing a selection rectangle around them and then click in the middle of the sheet.

Auto Un-Piling

turn on auto-move moderight click and select move all to unpile the components

Pcbnew will automatically unpile the components. First, enable the automatic mover by clicking the “Mode Module” button in the top toolbar. Then right click and select “Move All Modules”. Pcbnew also has an “auto placer,” which is different in that it tries to minimize the length of the connections between the modules (the ratsnest). You can fix components to prevent them from being moved by either command.

General Moving and Rotating–use keyboard shortcuts:

move components by pressing m or r

Continue moving components around by hovering the mouse pointer over them, and then pressing “m” or “r” to move or rotate.

Rats Nest (show rubber bands where all connections should be):

show the rats nest

<-Back                                                                                       Next->

About

CuriousInventor launched in late 2006 (pre-arduino era!) as a place to enable hobbyists, students, and musicians to create their own technology. We sold open-source kits and tools, and offered numerous guides & videos on things like soldering, metal working, screws, electronics, and more. 

The store is now mostly empty, but we’ve kept the product pages and guides up since they have useful information. Many of our guides and videos still rank on the first page of google searches and have been seen millions of times. Content on this site and the CuriousInventor YouTube channel produced by Scott Driscoll.

Top Videos